-
Gallery of Images:
-
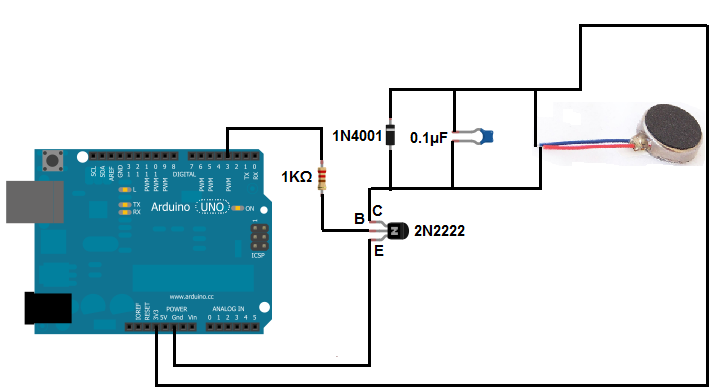
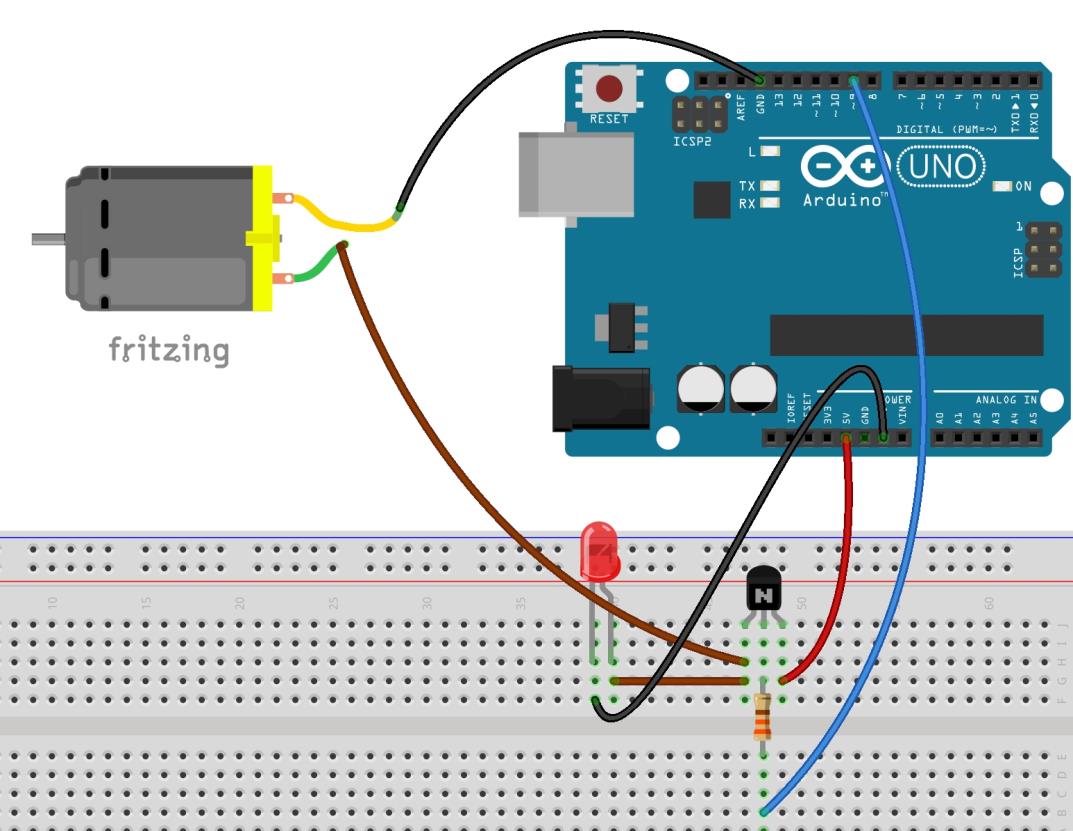
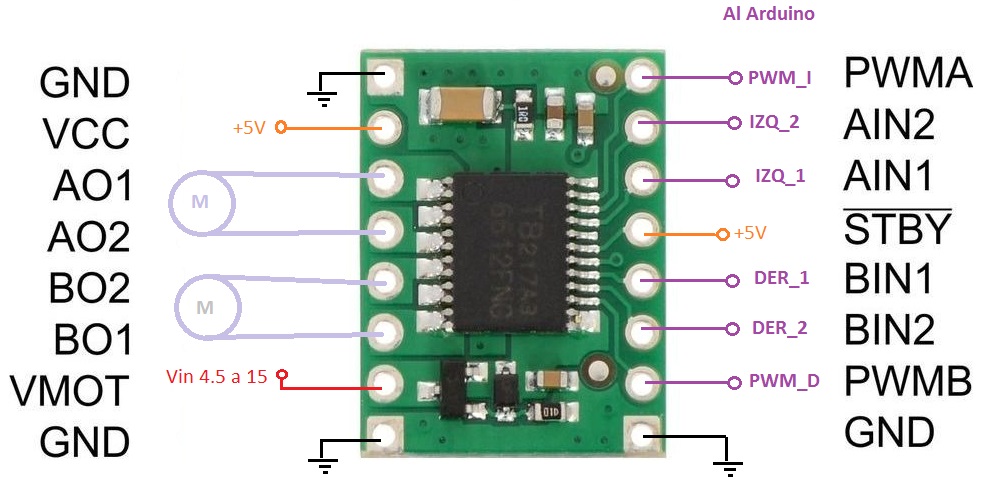
A demonstration on how to connect a large MOSFET to an Arduino for control of a large motor. The MOSFET used in the video is a. Arduino ve Mosfet ile DC Motor Kontrol. Merhaba, Bu yazda Arduino ve Mosfet kullanarak nasl DC Motor srlebileceini bulabilirsiniz. ncelikle gerek denemelerde kullandm. 2 Channel Relay Shield for Arduino UNO Circuit and PCB layout. 2 Channel Relay shield for Arduino UNO can be used in several applications like remote control, onoff AC or Dc load and any circuits which required isolated high current and high voltage. Schematic view of an Arduino connected to a potentiometer, a transistor, a DC motor, and a DC jack Breadboard view of an Arduino connected to a potentiometer, a transistor, a DC motor, and a DC jack. Next, add a diode in parallel with the collector and emitter of the transistor, pointing away from ground. Opensource electronic prototyping platform enabling users to create interactive electronic objects. Our ultimate controller for Arduino based robots, projects. We firmly suggest that controller for Sumo Robot projects. The board includes brain as a Arduino Nano (Nearly same as Arduino Uno controller, just smaller dimensions). I am trying to control a MOSFET with an Arduino. I have followed few tutorials and created schematic below. When I made circuit it did work, but I managed to destroy two Arduino nano clones with it Hi, I've got two projects ongoing and in both run into this issue. So I'm using Arduino Nano r3 with MOSFET IRF540n to control following devices (FET connected to Arduino's PWM pin): 1. 2A Now available from Tronixlabs Australia is this awesome NDrive shield from Freetronics. Using the NDrive shield you can directly control up to six separate highpower loads such as highintensity LEDs, lamps, motors, and relays. Arduino Nano ARDUINO NANO is a compact and bread board friendly version board based on ATmega328 processor. It is more or less same functionality as the Arduino UNO but. Para lograr esta comunicacin se tiene que instalar el driver correspondiente. Se puede descargar el driver desde la pgina de en producto Arduino Nano o bien dar clic en el siguiente link. For more detail: Soldering an SMT MOSFET Driver with a hotplate. JLCPCB Prototype 10 PCBs for 2 2 days Lead Time Chinas Largest PCB Prototype Enterprise, 300, 000 Customers 10, 000 Online Orders Per Day Arduino Nano Projects List; ESP32 Arduino Projects List. Arduino nano 1 Alimentation PC 600W 1 MOSFET IRLZ44N 1 LED 10. 5V 900mA (10W) 6500K Test pour une future rampe de LED 10W pour aquarium Le MOSFET ne chauffe pas du tout avec une petite lame l. arduino nano) Stepper motor drive: A4988 Spindle drive chip 1: Quimat DC HBridge 336V 15A Motor Driver PWM Module Circuit Board MOSFET Driver Motor Driving Board for Arduino Robot Smart Car. I am running Mac Sierra, and after following your instructions, installing the driver and running the boot command csrutil enable without kext listed below, my Mac now kernel panics and reboots when plugging the Arduino Nano into the USB port. Rainbowduino LED driver platform ATmega328 Rainbowduino v3. 0 Seeeduino Cloud We only provide software library or code examples for Arduino platform in most cases. It is not possible to provide software library demo code for all possible MCU platforms. I want to use my Arduino Nano to control a 12V peristaltic pump via a BDX33c NChannel MOSFET. The pump has a maximum current draw of 1, 4 A. Take advantage of this Arduino's small footprint and full Uno functionalities for your compact projects. Kit Workshop Basic level, without Board. Today we tinker us a driver for RGB LED strips using an Arduino. In addition, we use optocouplers to separtae our Arduino from the control unit with the 3 MOSFETs, which is not absolutely essential, but brings some advantages to the circuit. Download Arduino Nano Dew Controller Pro (DIY) for free. 3channel fully automated Dew Controller (DIY project) based on Arduino Nano. HALJIA IRF520 MOS FET MOSFET Driver Module for Arduino Raspberry Pi ARM MCU IRF520 MOSFET Driver Module. 0, Nano board CH340ATmega328P, compatible with Arduino Nano V3. CJRSLRB 6Pcs IRF520 MOSFET Driver Module for Arduino by ELEGOO for Arduino Nano V3. 0, Nano Board CH340ATmega328P Without USB Cable, Compatible with Arduino Nano V3. Took the 7805 and the 2N2222 out, powered the Nano directly from 12v via the 5v pin with pin3 going directly to the mosfet gate. The bulb got to full brightness in about 500ms (still not as fast as it could be), with gate voltage going from 0 to 4. 97v, but the mosfet was still getting very hot. Yes, if you use a MOSFET driver chip like a TC4427. You could also use regular transistors (BJT's) to construct a currentvoltage amplifier (essentially what the TC4427 does) and then either use a logiclevel MOSFET or a standard MOSFET if you have access to a. This little module (HCMODU0083) is a breakout board for the IFR520 MOSFET transistor. The module is designed to switch heavy DC loads from a single digital pin of your microcontroller. Its main purpose is to provide a low cost way to drive a DC motor for robotics applications, but the module can be used to control most high current DC loads. Genesis is the most powerful all in one board weve ever built for all types of robots. Just check out the features and you will find us right. Our flagship board Genesis, includes Arduino Nano, powerful 3A motor drivers, 0, 5 Ampere 5V regulator and complementary circuits for your robot project. On an Arduino Uno, the PWM pin 3 is connected to the gate pin of an Nchannel MOSFET STP16NF06L. The source pin is connected to ground of a 12 V power supply and drain pin connected to a multimeter. The source pin is connected to ground of a. Switch MOS FET Relay Driver Module Power Electronic Switch Relay IRF520N. Posted in Misc Hacks, Tool Hacks Tagged arduino nano, battery, battery welder, mosfet, spot welder Post navigation Correcting Color Blindness With DLP Projectors 4 Channel Relay Driver Shield For Arduino Nano Quad Channel Relay Board Arduino Nano Shield is a simple and convenient way to interface 4 relays for switching application in your project. The Arduino Nano 712V, 2A Dual Motor Controller is an addon module which allows you to control up to two DC motors at maximum of 2Amotor using the Arduino Nano USB Microcontroller v3. It includes breadboard friendliness for quick prototyping. 0 ATMEGA328P CH340 USB Chip Driver I. 0 ATMEGA328P CH340 USB Chip Driver Chip ATMEGA328P CH340 USB Chip Driver CH340 USB Data: Data Sheet Link: Transistor FET MosFET. For longer strips requiring more than 1 Amp, wire the power directly to the strip, then run power and ground wires back to the Arduino. This diagram shows connecting up with power NPN transistors such as TIP120, where Base is pin 1, Collector is pin 2 and Emitter is pin 3. Una forma de eliminar estas restricciones es emplear una etapa de preamplificacin, entre la salida de Arduino y el MOSFET. Esta etapa, o driver, puede ser un circuito formado por un simple BJT de pequeo tamao (N2222, BC337 o similar). Arduino Nano is a surface mount breadboard embedded version with integrated USB. It is a smallest, complete, and breadboard friendly. It has everything that DiecimilaDuemilanove has (electrically) with more analog input pins and onboard 5V AREF jumper. The IRF540N is a great MOSFET to start turning bigger loads on and off. With three components you can turn on and off just about any DC load you have. Turn loads on and off with your Arduino! Add a motor, solenoid, or get creative! Super Simple Arduino Load Driver V2. Gnralement, cela consiste balancer un courant trs fort (quelques ampres) sur le MOSFET pendant un temps trs court (quelques nano secondes). Le problme, c'est que ton arduino est incapable de sortir une telle intensit, mme pendant un instant trs court. Arduino Education is committed to empowering educators with the necessary hardware and software tools to create a more handson, innovative learning experience. Take your students on a fun and inspiring journey through the world of programming and electronics. MOSFET is an electronic devices with good switching characteristics. It is widely used in circuits, such as power supplies switching, motor drives, lighting dimmer and so on. Relay is another kind of module with switching characteristics. Arduino Nano ( ACS7125A ) Current Sensor (hight the mosfet driver is on)# define PWMFULL 1023 the actual value used by the Timer1 routines for 100 pwm duty cycle# define PWMMAX 100 the value for pwm duty cyle 0100# define PWMMIN 60 the value for pwm duty cyle 0100 (below this value the current running in. Now, the Arduino Nano outputs should be set up as PWM signals, so you can control the brightness, and these should be connected to the PWM inputs on the LED drivers. If you don't want to to control the brightness, just strobe the lights onoff, then fine just drive the PWM signal as. The MOSFET is turned on whenever there is a high logic level on the selected pin, and turned off when there is a low logic level on it. Features DC switching of up to 40V5A using an dedicated external power supply or up to 12V2. 5A using an external power supply shared with the Arduino. MOSFET IRF520 MOSFET Arduino ARM Raspberry Pi. El siguiente diseo es para un cargador de bateras Solar funcion por un Arduino Nano. Puede manejar una batera de cido de 12V estndar, como para una moto o un coche. Eventually you are going to find yourself holding a 12v solenoid, motor, or light and wondering How the heck am I supposed to control this from my Arduino? And we have covered this in the past. Today we are going to talk about another way of doing just that, this time with an NChannel MOSFET fieldeffect transistor, specifically the RFP30N06LE MOSFET (You can. IRF520 MOSFET Driver Module for Arduino Arduino NANO. It placed on my own PCB with all needed connectors an headers that i produce by laser transfer technology. However it is possible to use breadboard for this target. IRF520 mosfet module for heater control. For Arduino Double BTS7960B Dc 43A Stepper Motor Driver HBridge Pwm Ic New. Able to reverse the motor forward, two PWM input frequency up to 25kHZ. So we connect the gate to the Arduino through a 220 ohm current limiting resistor to protect the Arduino. Then we connect the motor to the external power supply and the Drain of the MOSFET. We complete the circuit by connecting up the grounds..
-
Related Images: